Saturday, February 13, 2016
Rejoice - Easter Easel Card
Here is one of the three cards my card classes are making this month. I LOVE Easel Cards.
Easter will be here before we know it so my classes are focusing on Easter this month.
I used the Rejoice Stamp Set from CTMH. I stamped the cross and sentiment in thistle Ink.
The background was dry embossed with the CTMH exclusive Damask Embossing Folder on Thistle Cardstock. I then rubbed my Thistle Ink pad lightly over the top for added dimension.
The egg was cut from the CTMH Exclusive Art Philosophy Cartridge.
The crystals on the cross started out as clear but I colored them with Shin Han Peony Purple Alcohol Marker.
Tuesday, February 9, 2016
Joyful Stars February Blog Hoop
Welcome to the Joyful Stars February Blog Hop. This hop features Current Close to my Heart Products by 13 fabulous and talented Consultants.
If you've come here from Krista's Blog you're on the right track. If you just happened upon my blog, that's fine, just continue from here and when you get back to me, you know you've seen them all.
Please leave us a little lovin' in our comments. We Love hearing from you! *Ü*
If you've come here from Krista's Blog you're on the right track. If you just happened upon my blog, that's fine, just continue from here and when you get back to me, you know you've seen them all.
I needed a Birthday Card on Saturday so I used the February Stamp of the Month (SOTM), called Balloon Animals. I used the Monkey Balloon and stamped it twice. Once in Desert Sand and again in Champagne. I just trimmed out certain parts of the champagne image and glued it to the Desert sand image. Then I used the Cherry Pink Shin Han Marker and colored in the mouth area and drew on a mouth
The background was stamped with the ink blots stamp set, then dry embossed with the Arrow Embossing Folder.
I punched a strip of white CS with the Chevron Border Punch and lined it with Red Shimmer Trim.
Now hop on over to Betty's Blog and check out her eye candy.
Wednesday, January 13, 2016
A Cricut Valentine
Here is my FIRST, All Cricut Cut Card.
I'm a stamper and only used my Cricut machine for cutting mats when I was having classes. But after having a play date with some friends, who helped me set up my new Cricut Explore Air, I broke down and made this card with NO STAMPING.
I liked how it turned out, but you may never see another card without stamping. Only because stamping is my passion. However, I will be using it more for parts my cards.
I think the cuts were from the Close to my Heart, exclusive Artbooking and Artisry Cartridges. With the exception of the Big Heart. That was from the free two week trial you get when you set up your machine for the first time.
Colors are Pixie, white and Poppy.
Challenges for this card:
Creative Craft Cottage - Release the Glitter
CCC Digi Creations - Use Die Cuts
Scribbles Designs - Have a Heart
Bastel-Traum - Valentine
Whimsie Doodle - Hearts a plenty
Hiding in my Craft Room - Embossing
Saturday, January 9, 2016
Joyful Stars January Blog Hop
Welcome to the Joyful Stars January Blog Hop. This hop features Current Close to my Heart Products by 10 fabulous and talented Consultants.
If you've come here from Helen's Blog you're on the right track. If you just happened upon my blog, that's fine, just continue from here and when you get back to me, you know you've seen them all.
My card today uses the "La Vie En Rose" Paper Packet for the background and the Enchantment Fundamentals for the small piece that the bow is attached to.
I used the ctmh Heart Embossing Folder on a strip of Pixie Cardstock. Thin swiped over it with Hollyhock ink pad.
The Rose and Sentiment are for the January Stamp of the Month, Beloved Bouquet.
This stamp set is available until January 31st and can be purchased for only $5.00 with a qualifying purchase.
Now hop on over to Krista's Blog and see what outstanding artwork she has to share with you. If you would like more detailed instructions, see below.
Thursday, January 7, 2016
Beloved Bouquet Birthday 2
Here is another Birthday card using the January Stamp of the month, "Beloved Bouquet".
I used the smaller rose with this card and also one of the "Picture My Life" (PML) cards that is on one of the paper sheets that comes with the Charlotte Paper Pack.
For all of you card makers, don't be afraid of these PML cards if you don't do scrapbooking. Just use them whole or cut them up and use them on your cards. They are so fun to design with.
The Butterfly is also from a new stamp set called "Your Beautiful Self".
The colors of ink are Sorbet, Slate and Whisper.
I also used Sorbet Cardstock with this card.
The Sentiment is from "Joyful Birthday" .
I added some hand stitching around the card with matching Embroidery Floss.
Tuesday, January 5, 2016
Beloved Bouquet Birthday
I have so many Birthday's of friends this month. So, I really need to get busy on making the cards. Fortunately, CTMH has the perfect Stamp of the Month. It's so easy for me to make a slew of cards when I have a stamp set that I LOVE!!!
This card is made using the New CTMH Charlotte paper pack as well as the January Stamp of the Month, "Beloved Bouquet".
I love the soft color in this paper. Perfect for any occasions.
I also used Sorbet cardstock, and sorbet, slate, & whisper inks.
I hand stitched around the card using matching embroidery floss and a chain stitch.
The inspiration for this card started with a sketch challenge from Atlantic Hearts.
I love the soft color in this paper. Perfect for any occasions.
I also used Sorbet cardstock, and sorbet, slate, & whisper inks.
I hand stitched around the card using matching embroidery floss and a chain stitch.
The inspiration for this card started with a sketch challenge from Atlantic Hearts.
Saturday, January 2, 2016
Beloved Bouquet Wedding
HAPPY NEW YEAR!
Well, it's that time of the year for new beginnings. And what better way to start then with a Wedding Card I made for our Niece who is getting married today.
The paper pack and Rose Stamp I used are Brand New from the Close to my Heart, Spring Seasonal Expressions Book which you can order from as of Yesterday, until the end of April.
The paper pack is called Charlotte. What an array of beautiful papers in this pack.
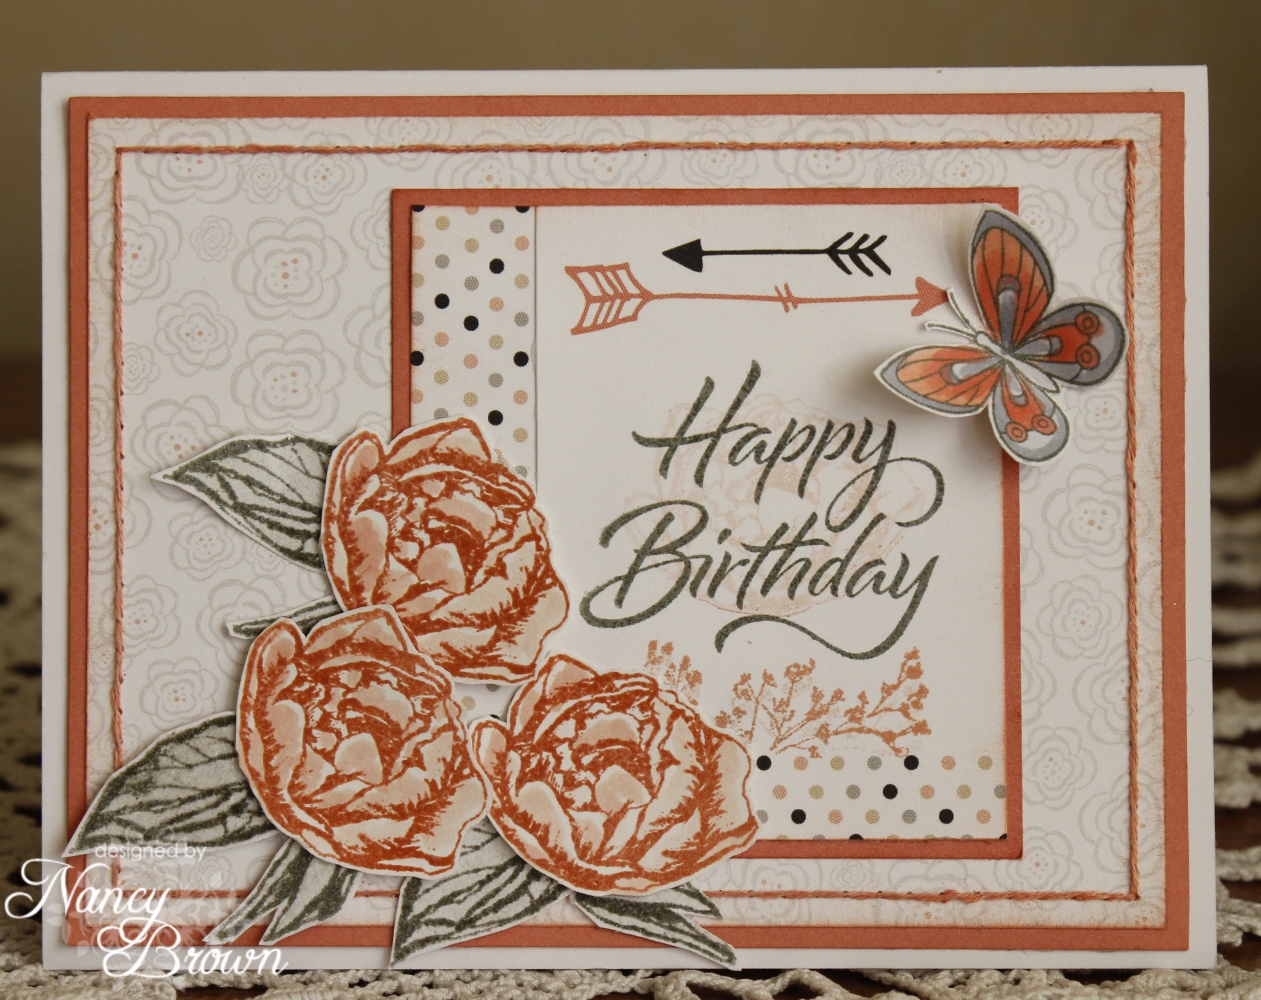
The Rose and Leaves are form the January Stamp of the Month called "Beloved Bouquet". I LOVE, LOVE, LOVE this stamp set. I can't wait to play and create more with this set this week. This set is only available from January 1-31, 2016.
I stamped the Rose in Sorbet Ink on Watercolor Paper and embossed it with Clear Detail Embossing Powder. I then used ink from the lid of the pad and colored in the petals with the water brush. I stamped the leaves on the same paper with Whisper Ink, embossed them, and used the ink from the lid of the whisper pad and water brush.
The Doily was cut using a die and my Cuttlebug.
I pulled out an old retired stamp set called "Precious Love" and stamped the Bride and Groom in the center with Slate Ink as well as the Sentiment. The cardstock I used is also slate.
I then found embroidery floss in my stash that matched the Sorbet papers and did some Hand Stitching around the three sides of the card. It's been about a year since I did any Hand Stitching on my cards and I didn't realize how much I missed it until I did it again. I
I then added some retired CTMH pearls to finish it off and some Clear Wink of Stella on the Rose, the dress and veil of the bride.
If there is anything you see above that you'd like to purchase from this new catalog, the items available have links to them on my website for easy ordering. Or, just browse the online catalogs and see what's new.
Challenges with this card:
Crafting Musketeers - New Beginnings
Challenges with this card:
Crafting Musketeers - New Beginnings
Wednesday, December 9, 2015
Joyful Stars December Blog Hop
Welcome to the Joyful Stars December Blog Hop. This hop features Current Close to my Heart Products by 12 fabulous and talented Consultants.
If you've come here from Stephanie's Blog you're on the right track. If you just happened upon my blog, that's fine, just continue from here and when you get back to me, you know you've seen them all.
Please leave us a little lovin' in our comments. We Love hearing from you! *Ü*
If you've come here from Stephanie's Blog you're on the right track. If you just happened upon my blog, that's fine, just continue from here and when you get back to me, you know you've seen them all.
Paper and stamps used are from the White Pines Scrapbooking Workshop on the Go.
Inks used were cranberry and New England Ivy.
Now hop on over to Crystal's Blog and see what outstanding artwork she has to share with you. If you would like more detailed instructions, see below.
Measurements are 5.5 x 12.
Measure half way down, which is 2.75 and make a tiny pencil mark. Do this on both sides.
Score the card at 2", 4", 8" & 10".
First fold is mountain, then valley, then valley, then mountain.
Cut each side from the pencil mark to the first TOP valley fold. BE PRECISE!!!
I saved the corners and glued them to the bottoms. NOT NECESSARY. But if you do, this is why I said to be precise.
That's all that's to it. Easy Peasy!!!
I did the same thing using both sides of the paper for two different looks.
Now here is where my OCD kicks in. In the card with the Tree side of the paper out, I needed to stamp the holly on the corners becasue when you glue the corners to the bottom, the trees are upside down. Stamping the Holly distracted from that.
I also felt that the look wasn't finished, so, since the card is only 4" wide, I cut a piece of coordinating CS to 4.25 x 5.5 and mounted it on the back. Then I was happy with the finished results.
Those of you that know me understand my obsession with perfection!!! *Ü*
Monday, November 9, 2015
Joyful Stars November Blog Hop
Welcome to the Joyful Stars November Blog Hop. This hop features Current Close to my Heart Products by 9 fabulous and talented Consultants.
If you've come here from Crystal's Blog you're on the right track. If you just happened upon my blog, that's fine, just continue from here and when you get back to me, you know you've seen them all.
Please leave us a little lovin' in our comments. We Love hearing from you! *Ü*
If you've come here from Crystal's Blog you're on the right track. If you just happened upon my blog, that's fine, just continue from here and when you get back to me, you know you've seen them all.
Please leave us a little lovin' in our comments. We Love hearing from you! *Ü*
My card today uses a Close to my Heart stamp set called "Fallen Leaves".
c
I first stamped the leaves with VersaMark ink, added clear embossing powder, and heat embossed. I then sponged on Eggplant, Poppy, And Saffron ink.
I then tried my hand at using the Close to my Heart Water Color paints. I first stamped the leaves onto the CTMH watercolor paper and cut out. Then I water colored them.
Friday, October 23, 2015
Dino-rrific Birthday
My 6 yr. old Grandson needed a Birthday card for a class mate today so this is what I whipped up for him using a sketch challenge from Inspired By Stamping.
Other Challenges for this card:
Aud Sentiment - Birthday card + Sentiment
Crafting With Attitude - Anything
Crafty Girls Creation - Anything
Digital Delights - Stamped image
Digi Chooseday - Birthday
Through the craft room door- Anything
Make My Monday - Inchies or Twinchies
Without Words - Purple and Green but no Halloween
Subscribe to:
Posts (Atom)


